Difficulty Level: Beginner
The following article is a concise introduction to the uses of reverb in orchestral mockups, covering the main components of the reverb plugin that comes with your DAW, as well as three common applications of orchestral reverb for film and game composing.
Reverb is a staple plugin in every composer’s toolkit — not least of all film and game composers. Unlike producers in some genres of music who use reverb primarily as a creative effect, film and game composers use reverb to emulate the sound and space of a traditional orchestra, achieving a degree of realism that wouldn’t otherwise be possible with sampled instruments in a DAW.
A word of advice: Get comfortable with your reverb plugin as soon as possible. You might be surprised at how its judicious use can really enhance your own MIDI mockups by allowing you to apply the best orchestral reverb possible.
Algorithmic vs. Convolution Reverb
To start, let me explain the two different types of reverb software: algorithmic and convolution.
Algorithmic reverb is the bog-standard plugin that comes with almost every DAW. Usually, this type of reverb can create a very solid reflection simulation quickly and fairly realistically. The CPU usage is also relatively low.
Convolution reverb is the next step up. Rather than artificially simulating reflections, it measures impulse responses taken from actual spaces and then passes your sound through these responses to create a tail that is extremely convincing. This type of reverb doesn’t come standard with your DAW. It can be very expensive and also take up a great deal of CPU, but the upside is that the results are very compelling, particularly when applied to solo instruments.
In this article, I’ll be focusing on algorithmic reverb, as most introductory-level users will not have a convolution plugin. Algorithmic reverb has served me, and many others, extremely well over the years and it will most likely fulfill your production needs.
While reverb, like all plugins, can be used to achieve any number of creative effects, there are three standard uses for reverb that film composers and producers should master for usage in their MIDI mockups:
- To add an element of realism to your instruments (subtle reverb)
- To simulate distance between instrument and listener by simulating an orchestral setup (moderate reverb)
- To drastically modify instruments into abstract sounds, pads, or atmospheres (exaggerated reverb)
We’ll touch on each of these in a bit more detail, but to give us some context, let’s first look at the key parameters of a reverb plugin.
Parameters of a Reverb Plugin
The screenshot below is taken from Logic Pro’s Averb plugin. There are other reverbs included in Logic that are much more sophisticated in nature (GoldVerb, SilverVerb, Space Designer, etc.), but I have chosen Averb as it demonstrates only the bare essentials.
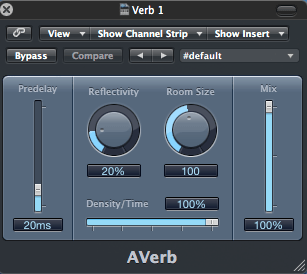
Basic parameters of a reverb plugin.
As you can see from left to right, the plugin comes with knobs and sliders for Predelay, Reflectivity, Room Size, Density/Time, and Mix settings. Let’s break each of these components down.
Pre-delay
In much the same fashion as the attack parameter in a compressor, the pre-delay determines the amount of time before the reverb chamber begins. This means that a longer setting will create a longer pause before the reverb kicks in, and a shorter setting will allow the reverb to come in more instantly. Pre-delay is often used on solo instruments or vocals so that the reverb effect does not simply muddy up the sound.
Reflectivity
The reflectivity parameter can be likened to defining the type of surface of the room you’re trying to simulate. Different surfaces reflect at different amounts: A low-reflectivity setting would simulate a room with a soft, sound-absorbent surface, while a high-reflectivity setting would emulate a room with much more reflective capability, such as stone or marble.
Room Size
As you will have guessed, this setting determines the size of the artificial room you’re simulating. Larger rooms will have a larger buildup of reflections, while smaller rooms will have smaller, subtler reflections.
Density/Time
In a nutshell, this parameter lets you control the duration of the reverb. This opens up a lot of doors when combined with the other parameters in the plugin. For example, you could have a large buildup of reflections that last for a short period of time or, in contrast, a subtle reflection that continues for much longer.
Mix
This setting lets you control the proportion of wet/dry signals. The Mix parameter could be likened to a “master volume” for the plugin. It provides a very simple way of increasing or decreasing the amount of reverb in your mix.
3 Main Uses of Reverb in Orchestral Mockups
Now that we have seen the features of a reverb plugin and what they do, let’s revisit our three main uses of orchestral reverb and see how you can put this knowledge to use in your MIDI mockups.
1. Add an element of realism to your instruments (subtle reverb)
Reverb is the tool for the job when you’re trying to emulate a performance recorded in a specific location. This can be particularly effective if you are composing diegetic music for film, but non-diegetic uses are also viable. Are you after an intimate and close sound, or a big-statement performance in a large hall? Your reverb plugin is the number one place to start achieving these goals.
2. Simulate distance between instrument and listener (moderate reverb)
Instruments that are further away will have a longer reverb tail due to the increased room size. This phenomenon can be used to your advantage: Our brains have been conditioned to associate impulse responses with distance and space, even if the physics of the sound are not logical.
For example, if you’re watching a western film set in the middle of a desert, the sound of a gunshot will always ricochet — even if there is nothing around for it to ricochet off! Use this trickery of the ear to your advantage by using reverb to create a space in your mix. If done correctly, you can simulate depth of stereo field and prevent dominant-sounding instruments from distracting the listener in incidental music.
For ultimate realism, it can help to refer to a diagram of where each section of the orchestra typically resides onstage.
3. Drastically modify instruments into abstract sounds, pads, or atmospheres (exaggerated reverb)
While reverb can be used to add realism to your MIDI mockups, it can also be very good at taking it away. That’s not always a bad thing. By using very extreme applications of reverb in a creative way, you can create some beautiful ambient textures and pads that act as a musical backdrop, enhancing your compositions.
Try adding what would otherwise be considered insane amounts of reverb to a sound of your choice (hint: if you have them, vocals are a good place to start). You might try overlapping several reverb plugins all at 100% mix with no dry signal. You’ll be amazed at the new and abstract sounds you can create. These sounds will at least inspire you, and at best be the backbone of your track.
Do you have any tips or tricks for applying reverb to MIDI mockups? We’d love to hear about them in the comments!
Leave a Reply