As a film or video game composer, the importance of keeping your tracks at a consistent volume can’t be overestimated. If your music contains elements that are piercingly loud, this will distract the viewer or user.
With that in mind, compression is an essential plugin for every film composer or producer to understand. It’s used relatively heavily in the film and video game industries so the music blends into the background, whereas non-incidental music features more subtle compression.
While compression only really works within one area of sound editing — volume — its abilities are still diverse and its applications almost endless. Let’s start by taking a quick look at what a compressor does.
What is Compression Used for in Music?

Image A: Unedited waveform. Image B: Increased gain.
Image A shows an example of an unedited waveform. This is a completely clean recording with no plugins whatsoever. As you can see, there is a very large gap between the loudest part of the waveform and the quietest part. This means that the quieter parts might be very hard to hear.
The obvious solution to this is to simply increase the gain on the track to make everything louder, as shown in Image B. This has successfully boosted the quieter parts of the waveform, but now the louder parts are above the red dotted line, which represents clipping.
So what can be done to avoid this dilemma? This is where compression comes in.
A compressor decreases the difference between the loudest and quietest parts on the track, making the loud parts quieter and the quiet parts louder. This is shown in Image C.

Image C: Compressed waveform. Image D: Compressed waveform with increased gain.
Once the waveform has been compressed, this gives you a lot more room to increase the gain of the track without the risk of clipping, as shown in Image D.
Parameters of a Compression Plugin
Now that we have seen the basics of what a compressor can do, let’s take a more detailed look at the options within the plugin. My DAW of choice is Logic X, so the screenshots I refer to will be the default Logic compressor, but each of the features I refer to are standard, no matter what software you use.
Threshold
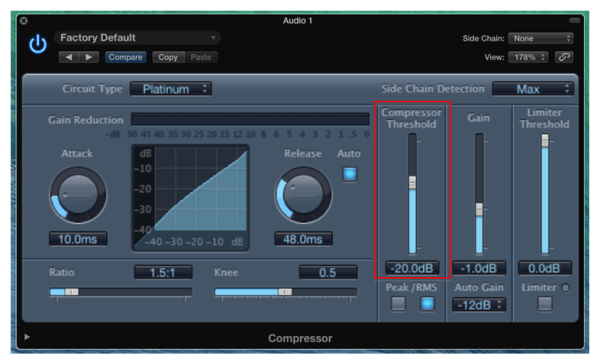
The compressor threshold, highlighted in red, effectively enables you to choose the proportion of the track that the compression will be applied to. A threshold of -20db means that the compressor will only get to work on sounds that are louder than -20db. Sounds quieter than this will be left unchanged.
Lowering the compressor threshold will compress your track more heavily, and the opposite is true if you increase the threshold. Use this tool to control how much of the track you want compressed.
Ratio

The ratio of a compressor lets you control how large or small you would like the gap between the loudest and quietest parts to be. A very low ratio will mean that the difference is very large, resulting in a subtler compression, whereas a very high ratio will mean that there is barely any difference between the loudest and quietest parts.
This feature is particularly useful for film and video game composers: To stop your music “interfering” too much, consider increasing the compressor ratio.
Attack

If a threshold can be said to give you vertical control (volume) of the compressor, then the attack can equally be said to give you horizontal control (time). The attack of a compressor lets you determine how much of a delay there should be before the compressor kicks in.
At a first glance, it may seem that there shouldn’t be any delay — why bother? Well, the typical example used to explain this feature is an acoustic guitar. Let’s say you want to compress an acoustic guitar track to a more consistent volume, but you still want to keep a human element to the recording. Attack lets you do this.
As the player plucks the strings of the guitar, this is the loudest part of the recording. Giving the compressor a slight attack delay means that you can still capture the volume of the string pluck, but anything after this point will be compressed as normal. Consider increasing the attack time of the compressor to bring out the attacks of each instrument.
Gain

The gain is the final step of the compressor. Decreasing the volume of the loudest parts means that you now have a lot of room to increase the overall volume of the track (as we saw in Images C and D at the beginning of this article). Rather than needing to use an extra plugin or volume automation to complete this final step, most compressors will have an inbuilt gain function so you can control everything in one plugin.
I hope this article has not only shed some light on the purpose of compression and its most common applications for film and game composers, but also given some insight as to how to go about making these changes to your tracks. The best way to really get a handle on compression — like any other plugin — is to spend some time playing around with it.
Remember, if you’re an incidental composer then compression is likely to be more heavily used; however, if you’re writing music purely for music’s sake, then I would urge you to be more subtle with your compression. Ultimately, the choice is yours.
Do you have any tips for dynamic compression when scoring for film or games? We’d love to hear them!
Leave a Reply